
Noiran's Hidden Legacy — Stage 4 Guide
What this guide is. A walkthrough breakdown from Qaser_org's channel — that is, a rotation proven in practice, not theory. The callouts marked "from client data" are our own numbers extracted from the Aion 2 client (build 106): official names, levels, bosses, and achievement conditions. It helps to keep these two sources separate: the first shows how to play, the second shows exactly what you are fighting.
What this dungeon is
Noiran's Hidden Legacy (Korean: 노이란의 숨겨진 유산) is a party dungeon with four difficulty stages. This guide covers the fourth, hardest one: it differs from the earlier stages not only in numbers but also in specific modifiers that do not exist on the lower stages.
The story backdrop, per the in-game description: Kreion is a research group founded by Noiran, a genius engineer from the Lepharists. Trying to save a world where Odyle is rapidly running out, they synthesized a replacement for it. The new energy turned out to be catastrophically unstable; Noiran shut down the project and sealed the laboratory with her own hands. Not everyone agreed: radicals from Kreion broke into the abandoned facility and continued the work, performing monstrous experiments on living beings. The original goal is long forgotten — now they live only for the experiments themselves.
From client data
| Parameter | Value |
|---|---|
| Official name | Noiran's Hidden Legacy / 노이란의 숨겨진 유산 / 諾伊蘭隱藏的遺產 |
| Difficulty stages | 4 (internal names LegacyNoiran_G_01…04, ids 610030–610033) |
| Content type | party dungeon, Party Challenge, tier 4 |
| Mob and boss level on stage 4 | 92 — for all of them without exception |
| Instance lifetime | 30 minutes |
| Stage 4 bosses | Incomplete Braunt · Mad Klominster · Askran |
All three are flagged as hero monsters in the data, i.e. full-fledged bosses rather than buffed elites. The floor's regular mobs are infected Shulacks (worker, sentry, overseer), deranged Kreion researchers and technicians, a mutated test subject, an infected blob, and slime.
What we do not know. The client names all three bosses but never says which of the first two is the "poison" one and which is the "air" one: their NPC skills have no localized names. So below the bosses are named by mechanic, as in the original breakdown, and the English names are given as a pair without mapping. Confirm in-game — and the labels can be matched up.
Stage 4 difficulty modifiers
Three rules that apply for the entire run and break the playstyle you are used to from the lower stages.
- Full clear. You must kill absolutely every monster. Skip even one — the door to the final boss stays locked.
- Potion debuff. Every point of damage taken from monsters significantly increases the cooldown of your health potions. Healing "out of habit" will not work.
- Stacks and falling bombs. Hits from mobs and the boss apply stacks; when they accumulate, an explosion occurs and three bombs fall in sequence from above. Neither a shield nor a stance blocks them — only moving off the spot.
Boss 1 Incomplete Braunt — Guardian of the poison field
There are only two mechanics, but the second one decides the outcome of the fight.
1. Double circular AoE wave

The boss hits a red zone around himself — and immediately after the hit, that same area becomes safe.
How to do it: Shift back out of the center, then Shift forward back into the center.
2. Poison flood of the field


The entire platform gets flooded with poison; only the center remains safe. Players get markers of two types placed on them:
- Wide red lines — run sideways and lay the poison strip strictly along the outer edge of the circle.
- Red circles — carry these to the very edge as well.
Do not flood the center. If poison covers the safe island, the whole party dies. If you already messed up — try to preserve at least a patch of clean ground: that is enough for one or two players to survive the phase and raise the rest.
Boss 2 Mad Klominster — Master of Air Currents
1. Double Circular AoE Wave


The boss hits a red zone around himself — and immediately after the strike, that same area becomes safe.
How to handle: Shift back out of the center, then Shift forward back into the center.
2. Air Currents and Bombs
The entire fight hinges on one thing: controlling the delayed-action bombs.
Vents activate on the arena — air currents. Two random players get numbered markers:
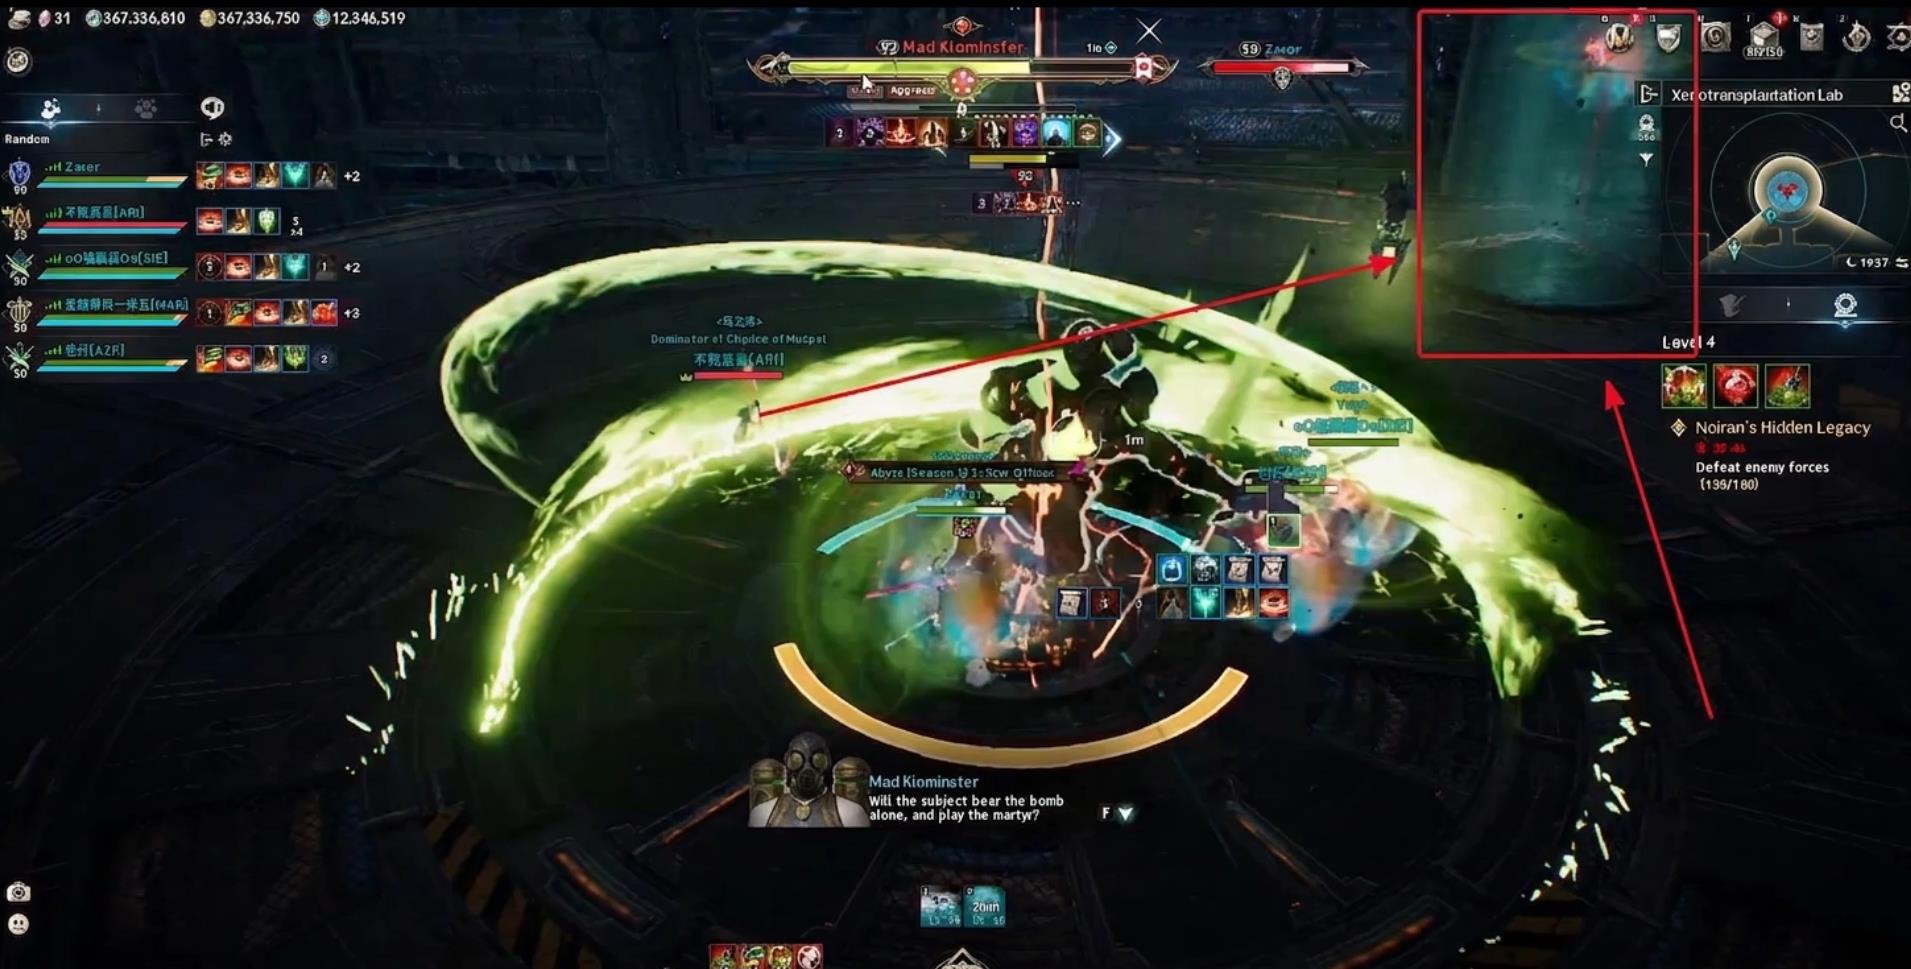
- #1 — explodes in 4 seconds.
- #2 — explodes in 8 seconds.
Marked players must ride the air current up and explode in the air without hitting the party.
How to handle: 1 second left — step into the current and explode at the very top. 2 seconds left — step into the current and start gliding at the top point.
All other players stay on the ground in the center for the duration of the phase and do not move.
Boss 3 — Askran
The final boss has a set of phases with a strict rotation. The key to the whole fight is the orange bombs: you drop them in advance, but you need them two mechanics later, and without them you cannot survive the one-shot.
1. Orange Stasis Bombs


Red circles appear under players, and orange bombs land in them. Stepping on such a bomb turns the player to stone after 1.5 seconds.
How to handle: Drop them away from the center. Stasis is the only way to survive the one-shot attack Area Incineration, so the bombs are not an obstacle — they are a consumable you are preparing for yourself.
2. Stance: Green and Red Bombs
The boss takes a stance and charges a projectile. Everything then depends on the color:
- Green bomb — the whole party must urgently stack at the impact point: a protective dome forms inside the blast.
- Red bomb — on the contrary, spread out in different directions.
3. Double Strike


This mechanic works the same as with the first two bosses: first you need to leap back from the boss, then return.
4. Leap Back, Damage Share, and Area Incineration
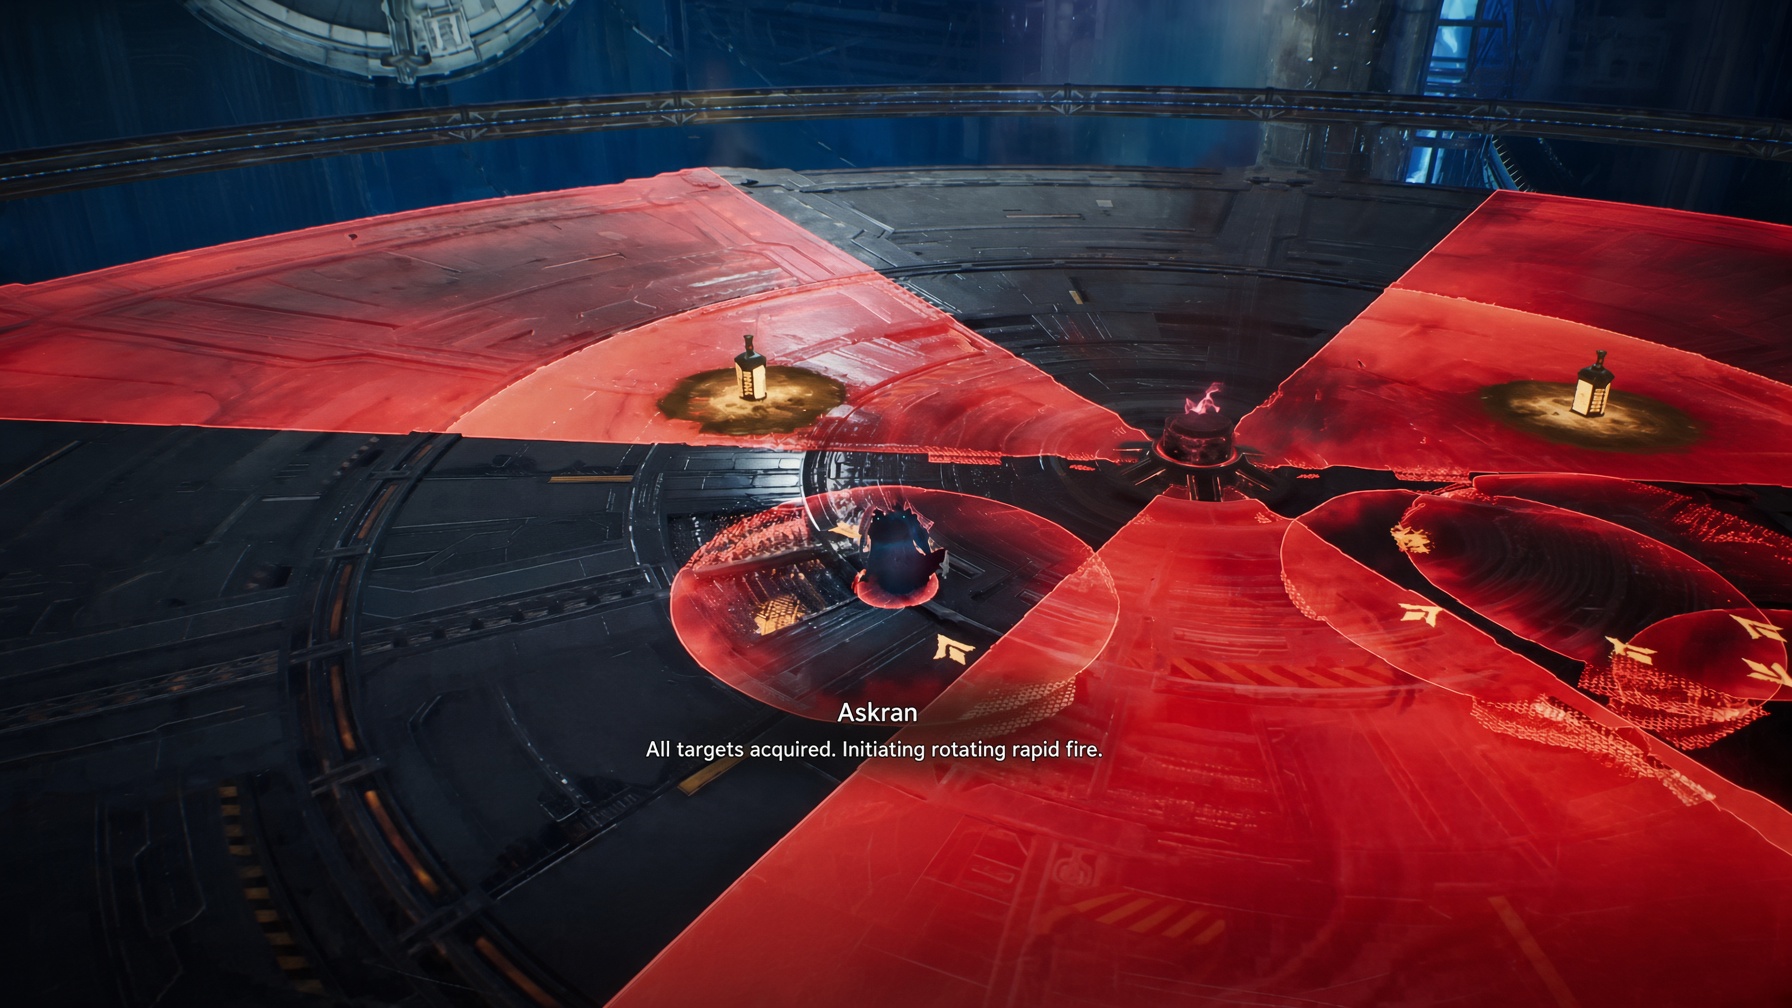
A chain of three mechanics in a row, and you need to handle it as one continuous motion.
- The boss leaps back to the edge of the platform — the party stacks in the center.
- The "carousel" (damage share): the party runs together in one direction, taking damage and carefully weaving around the previously dropped orange bombs.
- The "carousel" (spread out): arrows face outward — spread out, do not stack together!
- Area Incineration: right after the carousel, the boss starts casting a lethal incineration. Everyone runs to their own orange bomb, steps on it, turns to stone — and survives the blast with no damage.
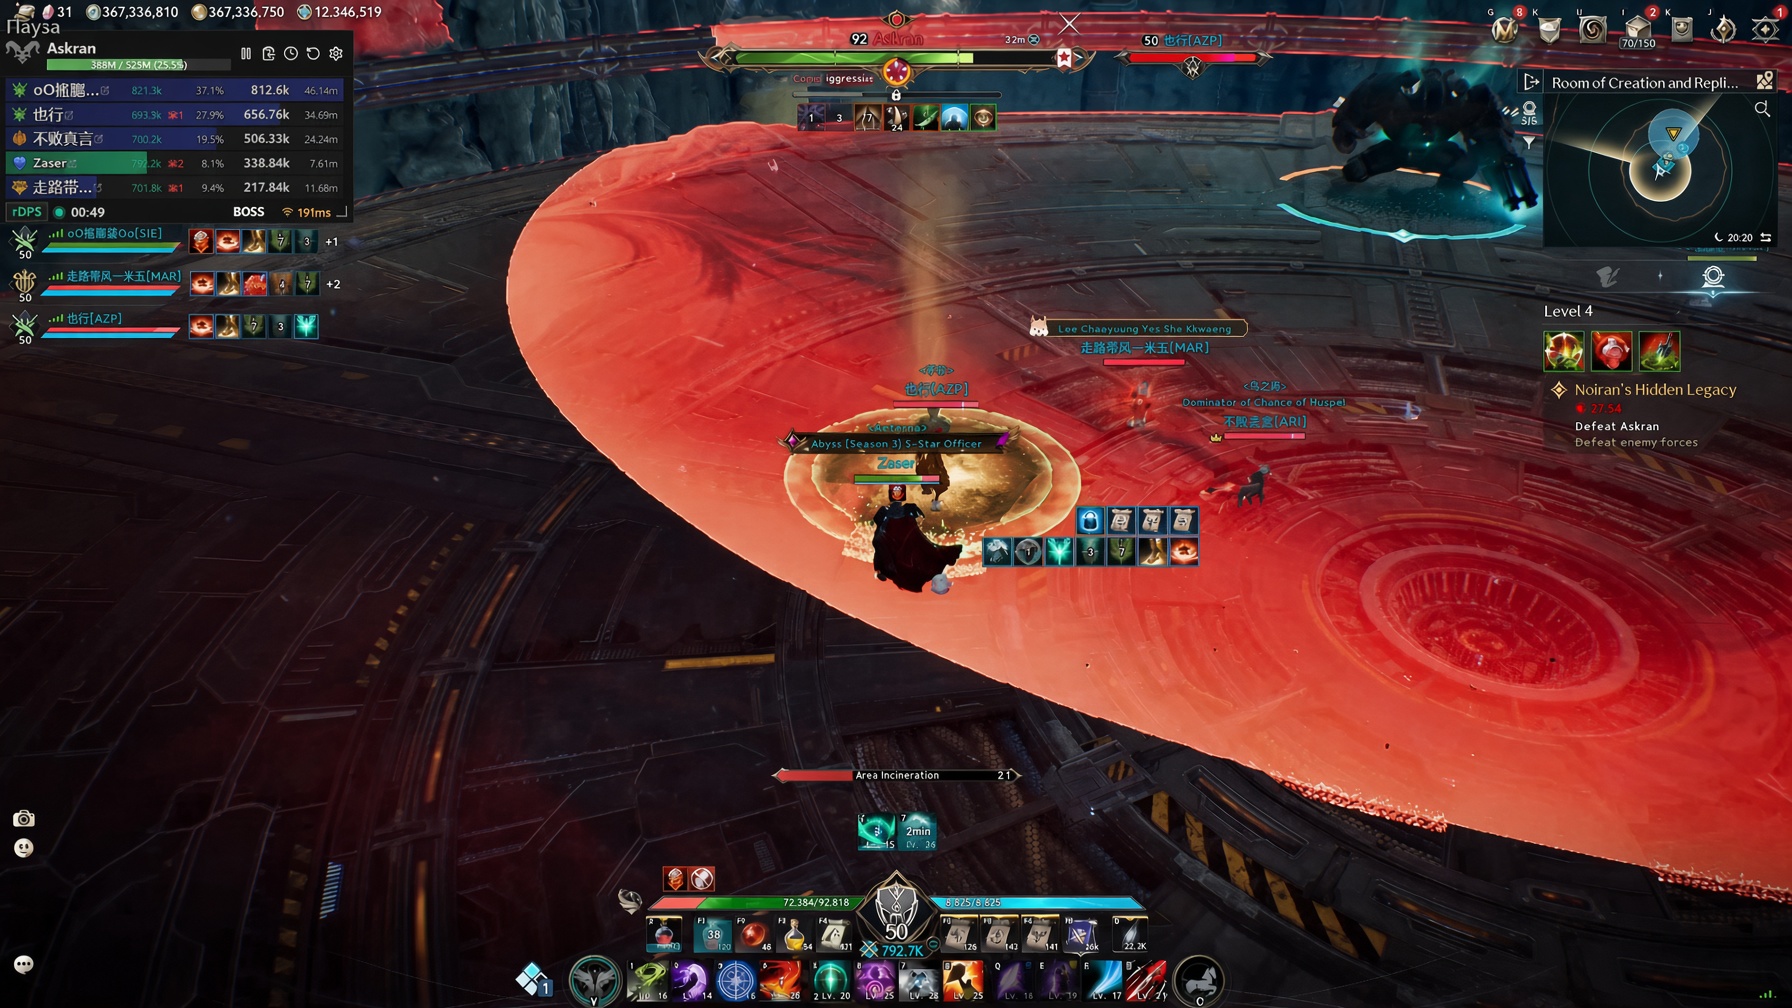
5. Phase at 50% HP: Lava Flood
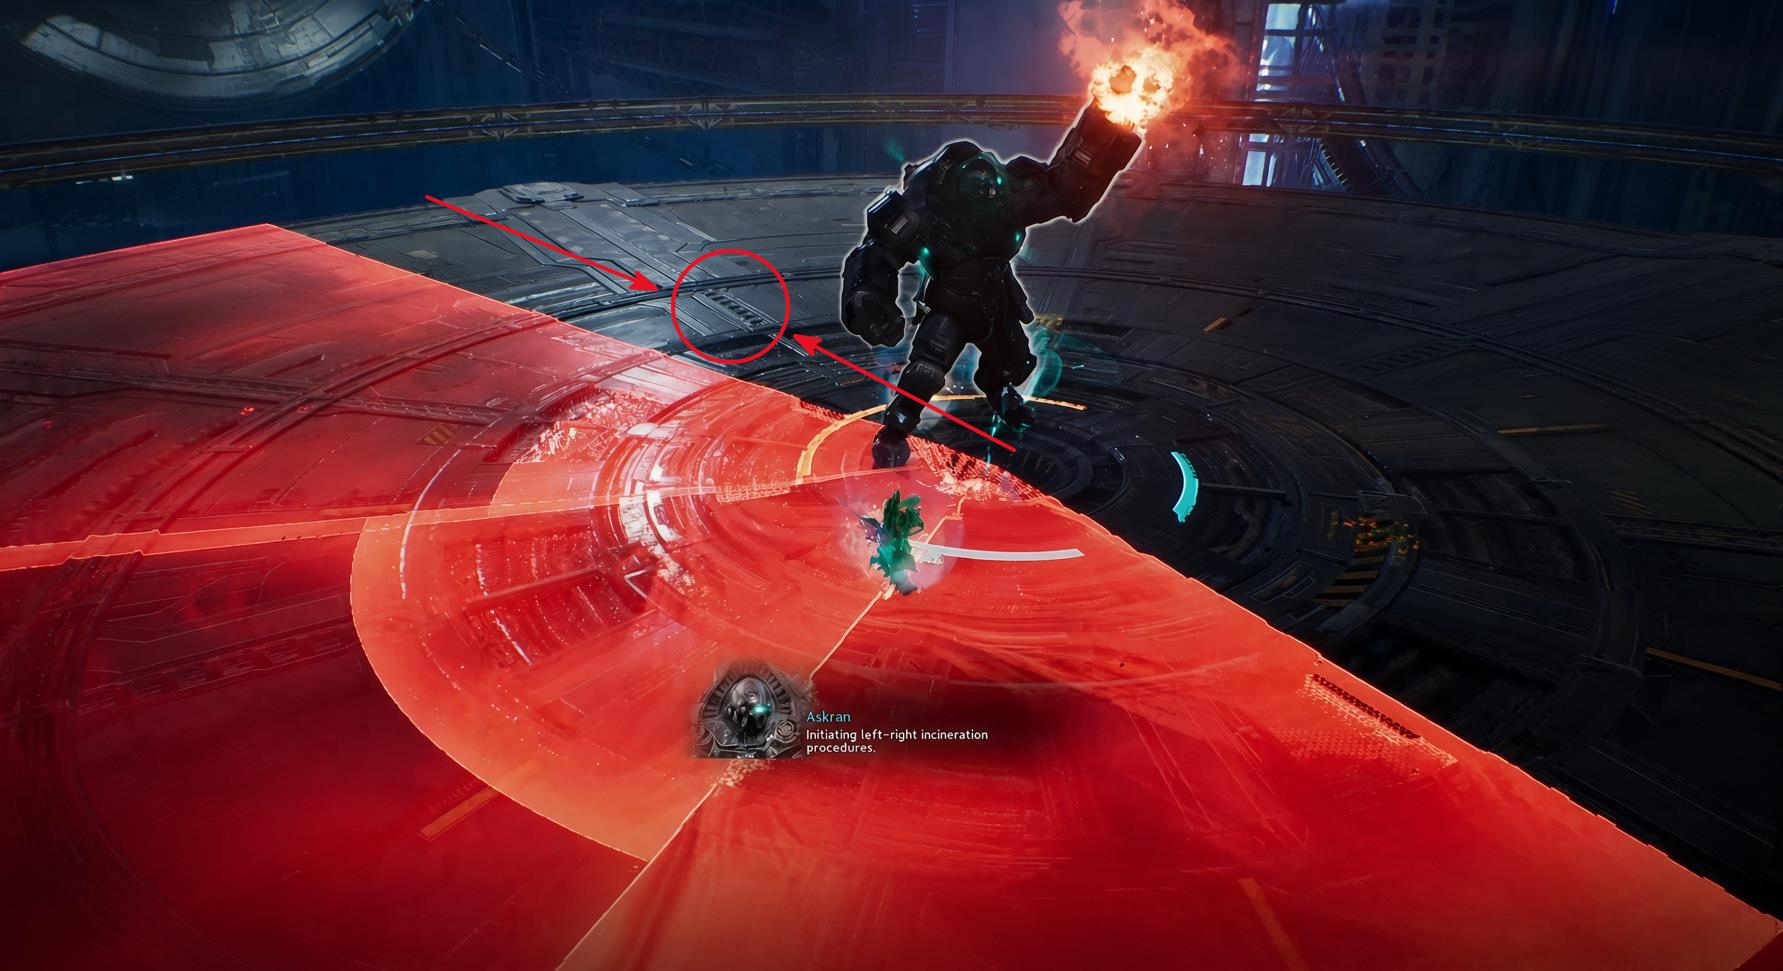
At half health, the boss jumps to the center and floods the arena with lava in his first two sweeps.
How to handle: As soon as he has carved out the first half of the field, the whole party needs to jump behind his back. Then the second strike lands in the same spot, and more than half the arena remains safe.
6. Phase at 35% HP: Colored Lanterns and Stagger
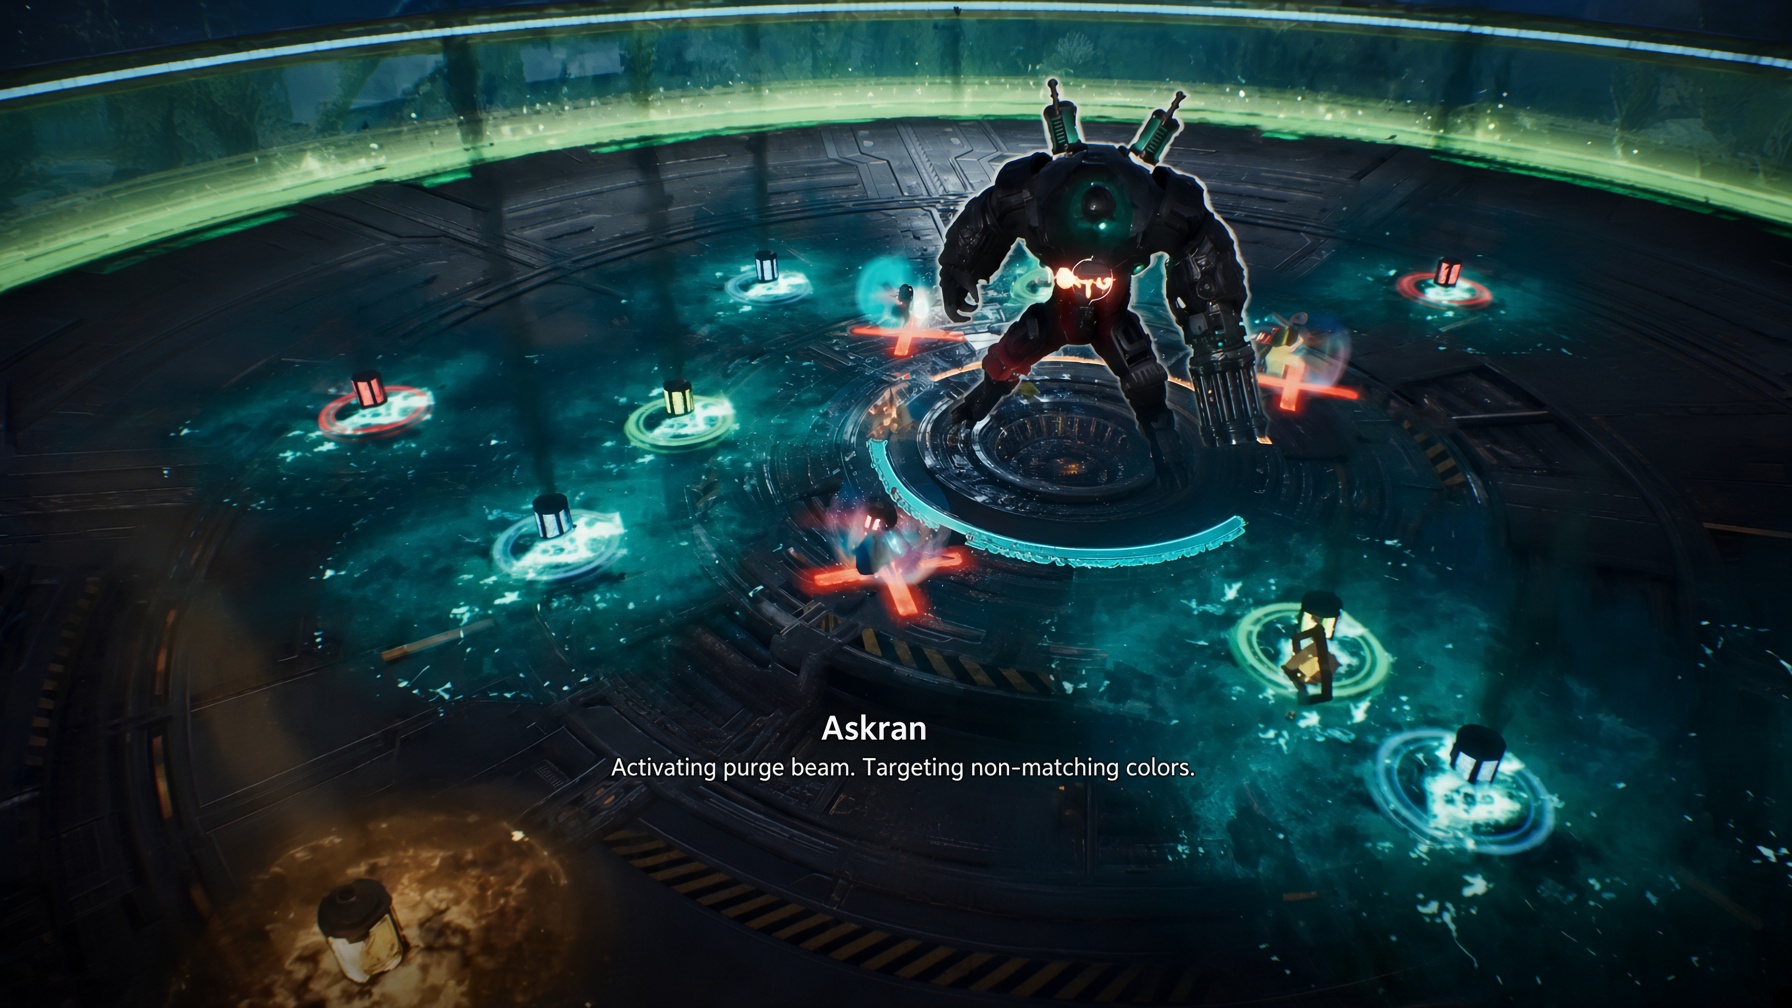
Three colored lanterns appear — blue, red, and green — and the zones start closing in toward the center.
- Colors are assigned in advance, before the phase. Red and blue are the usual picks.
- Each player takes their own color and breaks the corresponding shrinking field with it.
- After breaking it, pick up the bomb with the F key, aim at the boss, and press F again to throw.
- To break the shield and put the boss into a stagger, you need 4 colored bombs in total.
- Meanwhile, dodge the red crosses under your feet — the phase does not cancel them.
After the 35% HP mark, there are no new mechanics: the boss starts repeating everything you have already seen in a loop until he dies.
Stage 4 Achievements
According to the client data, exactly three achievements are tied to the fourth stage — one for each tier:
| Achievement | Condition |
|---|---|
| Noiran's Hidden Legacy Stage 4 I | clear the stage |
| Noiran's Hidden Legacy Stage 4 II | clear the stage within 7 minutes |
| Noiran's Hidden Legacy Stage 4 III | clear the stage with no deaths in the party |
Note the combination: a full clear is mandatory, and the time requirement is seven minutes. This means "slow and steady" only works for the first of the three achievements.
"You dare defile Noiran's work?!" — a line from the dungeon.
Source
The walkthrough breakdown is based on materials from the Qaser_org channel. Names, levels, boss compositions, and achievement conditions have been cross-checked with the Aion 2 client (build 106) and are marked in the text as client data.